5.2. Assign dynamic IPs to BMCs
There are two ways of doing this:
you specify a static IP by setting it in the BIOS of each compute node
you let BMCs determine an IP via DHCP
For our systems, all BMCs are already configured to use DHCP. You can
listen to the traffic coming into 192.168.0.1 using the tcpdump
utility. But before we can use tcpdump, we have to configure the firewall.
5.2.1. Configure firewall
Allow all traffic from eno3 and eno4 networks
Disable SElinux
# check if SE linux is disabled
getenforce
You can temporarily disable SElinux with
setenforce 0
Otherwise edit
/etc/selinux/config, setSELINUX=disabledand reboot.# This file controls the state of SELinux on the system. # SELINUX= can take one of these three values: # enforcing - SELinux security policy is enforced. # permissive - SELinux prints warnings instead of enforcing. # disabled - No SELinux policy is loaded. SELINUX=disabled # SELINUXTYPE= can take one of three values: # targeted - Targeted processes are protected, # minimum - Modification of targeted policy. Only selected processes are protected. # mls - Multi Level Security protection. SELINUXTYPE=targeted
Disable firewalld
systemctl disable firewalld
systemctl stop firewalld
We will not be using firewalld, but configure iptables directly. iptables and ip6tables are used to setup, maintain and inspect the tables for IPv4 and IPv4 packet filter rules in the Linux kernel.
Install iptables services
While iptables is part of the Linux kernel, to automatically load rules during boot own init system will have to load them from somewhere. On systemd based systems this is usually done through a systemd service. On RHEL and AlmaLinux this service is installed via
iptables-servicespackage.yum install iptables-services systemctl enable iptables systemctl start iptables
[root@master ~]# systemctl status iptables
● iptables.service - IPv4 firewall with iptables
Loaded: loaded (/usr/lib/systemd/system/iptables.service; enabled; vendor preset: disabled)
Active: active (exited) since Mon 2019-02-04 12:27:33 EST; 1s ago
Process: 3522 ExecStart=/usr/libexec/iptables/iptables.init start (code=exited, status=0/SUCCESS)
Main PID: 3522 (code=exited, status=0/SUCCESS)

Feb 04 12:27:33 master systemd[1]: Starting IPv4 firewall with iptables...
Feb 04 12:27:33 master iptables.init[3522]: iptables: Applying firewall rules: [  OK  ]
Feb 04 12:27:33 master systemd[1]: Started IPv4 firewall with iptables.
You can view the active set of iptables rules with the
iptables-savecommand[root@master ~]# iptables-save # Generated by iptables-save v1.4.21 on Mon Feb 4 12:39:38 2019 *filter :INPUT ACCEPT [0:0] :FORWARD ACCEPT [0:0] :OUTPUT ACCEPT [63:5564] -A INPUT -m state --state RELATED,ESTABLISHED -j ACCEPT -A INPUT -p icmp -j ACCEPT -A INPUT -i lo -j ACCEPT -A INPUT -p tcp -m state --state NEW -m tcp --dport 22 -j ACCEPT -A INPUT -j REJECT --reject-with icmp-host-prohibited -A FORWARD -j REJECT --reject-with icmp-host-prohibited COMMIT # Completed on Mon Feb 4 12:39:38 2019
The default rules need to be adjusted to meet our requirements. They are defined in
/etc/sysconfig/iptables. Open a text editor and edit them.*filter :INPUT DROP [0:0] :FORWARD DROP [0:0] :OUTPUT ACCEPT [0:0] -A INPUT -m state --state RELATED,ESTABLISHED -j ACCEPT -A INPUT -p icmp -j ACCEPT -A INPUT -i lo -j ACCEPT -A INPUT -i eno3 -j ACCEPT -A INPUT -i eno4 -j ACCEPT -A INPUT -p tcp -m state --state NEW -m tcp --dport 22 -j ACCEPT -A INPUT -j REJECT --reject-with icmp-host-prohibited -A FORWARD -j REJECT --reject-with icmp-host-prohibited COMMIT
This will block all traffic except from the local network (
lo), internal networkeno3andeno4, and only SSH and ICMP (ping) on everything facing outside. Usually it’s a good idea to lock it down even more, but for now, let’s use this configuration.Finally, apply this configuration by reloading the
iptablesservice.systemctl reload iptables
Verify the active configuration using
iptables-save.Complete the configuration for
eno3andeno4Apply static IPs to both interfaces
Interface
IP
Subnet Mask
Prefix
CIDR Notation
eno3
192.168.0.1
255.255.240.0
20
192.168.0.1/20
eno4
192.168.16.1
255.255.240.0
20
192.168.16.1/20
5.2.2. Listen to traffic via tcpdump
You can learn the MAC addresses of the BMCs by listening to the traffic on the IPMI network port. They will send DHCP requests asking for an IP address. Remember, this is a broadcast, so anyone listening for these messages can answer them. That is why you should only have on DHCP server listening on a network!
Install the
tcpdumputility[root@master ~]# yum install tcpdump
Launch
tcpdumpand listen for packets[root@master ~]# tcpdump -i eno3 port bootps tcpdump: verbose output suppressed, use -v or -vv for full protocol decode listening on ens4, link-type EN10MB (Ethernet), capture size 262144 bytes 16:00:19.883534 IP 0.0.0.0.bootpc > 255.255.255.255.bootps: BOOTP/DHCP, Request from de:ad:be:ef:09:39 (oui Unknown), length 397 16:00:20.916569 IP 0.0.0.0.bootpc > 255.255.255.255.bootps: BOOTP/DHCP, Request from de:ad:be:ef:09:39 (oui Unknown), length 397 16:00:22.948822 IP 0.0.0.0.bootpc > 255.255.255.255.bootps: BOOTP/DHCP, Request from de:ad:be:ef:09:39 (oui Unknown), length 397 16:00:27.013351 IP 0.0.0.0.bootpc > 255.255.255.255.bootps: BOOTP/DHCP, Request from de:ad:be:ef:09:39 (oui Unknown), length 397
You can gain more insight into what the request contains using the
-vv. Some vendors include information such as Service Tag which could help you identify the machine.[root@master ~]# tcpdump -i eno3 -vv port bootps tcpdump: listening on ens4, link-type EN10MB (Ethernet), capture size 262144 bytes 16:01:36.843256 IP (tos 0x0, ttl 64, id 256, offset 0, flags [none], proto UDP (17), length 425) 0.0.0.0.bootpc > 255.255.255.255.bootps: [udp sum ok] BOOTP/DHCP, Request from de:ad:be:ef:09:39 (oui Unknown), length 397, xid 0x892794b, secs 4, Flags [none] (0x0000) Client-Ethernet-Address de:ad:be:ef:09:39 (oui Unknown) Vendor-rfc1048 Extensions Magic Cookie 0x63825363 DHCP-Message Option 53, length 1: Discover MSZ Option 57, length 2: 1472 ARCH Option 93, length 2: 0 NDI Option 94, length 3: 1.2.1 Vendor-Class Option 60, length 32: "PXEClient:Arch:00000:UNDI:002001" User-Class Option 77, length 4: instance#1: ERROR: invalid option Parameter-Request Option 55, length 23: Subnet-Mask, Default-Gateway, Domain-Name-Server, LOG Hostname, Domain-Name, RP, MTU Vendor-Option, Vendor-Class, TFTP, BF Option 119, Option 128, Option 129, Option 130 Option 131, Option 132, Option 133, Option 134 Option 135, Option 175, Option 203 T175 Option 175, length 45: 177.5.1.16.236.129.57.235.3.1.0.0.23.1.1.34.1.1.19.1.1.17.1.1.39.1.1.25.1.1.16.1.2.33.1.1.21.1.1.24.1.1.18.1.1 Client-ID Option 61, length 7: ether de:ad:be:ef:09:39 GUID Option 97, length 17: 0.0.0.0.0.0.0.0.0.0.0.0.0.0.0.0.0
Decide which server is c01, c02, and c03 and write down their BMC MAC addresses and assign IP addresses within the management network subnet to them.
Example:
Hostname
BMC MAC
IPMI IP
c01.mgmt
de:ad:be:ef:09:39
192.168.1.1
c02.mgmt
de:ad:be:ef:05:10
192.168.1.2
c03.mgmt
de:ad:be:ef:04:90
192.168.1.3
5.2.3. Set up DHCP for the management network (IPMI)
Our master node will run a DHCP server to respond to the DHCP requests and assign static IPs to our BMCs.
Install a DHCP server There are multiple packages which can perform this function, we will use the
dhcppackage in AlmaLinux.yum install dhcp-server
Enable and try to start the DHCP Server
systemctl enable dhcpd
systemctl start dhcpd
Trying to start the DHCP server will fail without configuration.
[root@master ~]# systemctl status dhcpd
● dhcpd.service - DHCPv4 Server Daemon
   Loaded: loaded (/usr/lib/systemd/system/dhcpd.service; enabled; vendor preset: disabled)
   Active: failed (Result: exit-code) since Mon 2019-02-04 17:37:01 EST; 4s ago
     Docs: man:dhcpd(8)
           man:dhcpd.conf(5)
Process: 14935 ExecStart=/usr/sbin/dhcpd -f -cf /etc/dhcp/dhcpd.conf -user dhcpd -group dhcpd --no-pid (code=exited, status=1/FAILURE)
   Main PID: 14935 (code=exited, status=1/FAILURE)

  Feb 04 17:37:01 master dhcpd[14935]: Internet Systems Consortium DHCP Server 4.2.5
  Feb 04 17:37:01 master dhcpd[14935]: Copyright 2004-2013 Internet Systems Consortium.
  Feb 04 17:37:01 master dhcpd[14935]: All rights reserved.
  Feb 04 17:37:01 master dhcpd[14935]: For info, please visit https://www.isc.org/software/dhcp/
  Feb 04 17:37:01 master dhcpd[14935]: Not searching LDAP since ldap-server, ldap-port and ldap-base-dn were not specified in the config file
  Feb 04 17:37:01 master dhcpd[14935]: Wrote 0 leases to leases file.
  Feb 04 17:37:01 master systemd[1]: dhcpd.service: main process exited, code=exited, status=1/FAILURE
  Feb 04 17:37:01 master systemd[1]: Failed to start DHCPv4 Server Daemon.
  Feb 04 17:37:01 master systemd[1]: Unit dhcpd.service entered failed state.
  Feb 04 17:37:01 master systemd[1]: dhcpd.service failed.
  Hint: Some lines were ellipsized, use -l to show in full.
Configure the DHCP server
We will first have to tell the server which subnets it should listen on. Edit the DHCP server configuration file
/etc/dhcp/dhcpd.confwith an editor of your choice. By default, it will be empty. You can find an example configuration file in/usr/share/doc/dhcp*/dhcpd.conf.example, which includes many comments explaining different use cases.Configure the IPMI subnet and add two host declarations to specify fixed IPs.
subnet 192.168.0.0 netmask 255.255.240.0 {
    option routers 192.168.0.1;
    option domain-name "mgmt";
    option domain-name-servers 192.168.0.1;
    option subnet-mask 255.255.240.0;
    default-lease-time 600;
    max-lease-time 7200;
}

host c01-mgmt {
    hardware ethernet de:ad:be:ef:09:39;
    fixed-address 192.168.1.1;
    option subnet-mask 255.255.240.0;
}

host c02-mgmt {
    hardware ethernet de:ad:be:ef:05:10;
    fixed-address 192.168.1.2;
    option subnet-mask 255.255.240.0;
}
Start/Restart the DHCP
[root@master ~]# systemctl restart dhcpd
Observe DHCP traffic and ping BMCs
If you connect a BMC to the network you should see something similar to the following traffic
[root@master ~]# tcpdump -i eno3 port bootps
tcpdump: verbose output suppressed, use -v or -vv for full protocol decode
listening on eno3, link-type EN10MB (Ethernet), capture size 262144 bytes
17:55:21.240118 IP 0.0.0.0.bootpc > 255.255.255.255.bootps: BOOTP/DHCP, Request from de:ad:be:ef:09:39 (oui Unknown), length 397
17:55:21.240290 IP master.bootps > 192.168.1.1.bootpc: BOOTP/DHCP, Reply, length 300
17:55:23.272290 IP 0.0.0.0.bootpc > 255.255.255.255.bootps: BOOTP/DHCP, Request from de:ad:be:ef:09:39 (oui Unknown), length 409
17:55:23.272447 IP master.bootps > 192.168.1.1.bootpc: BOOTP/DHCP, Reply, length 300
Try to ping the BMCs using their IP addresses
ping  192.168.1.1
ping  192.168.1.2
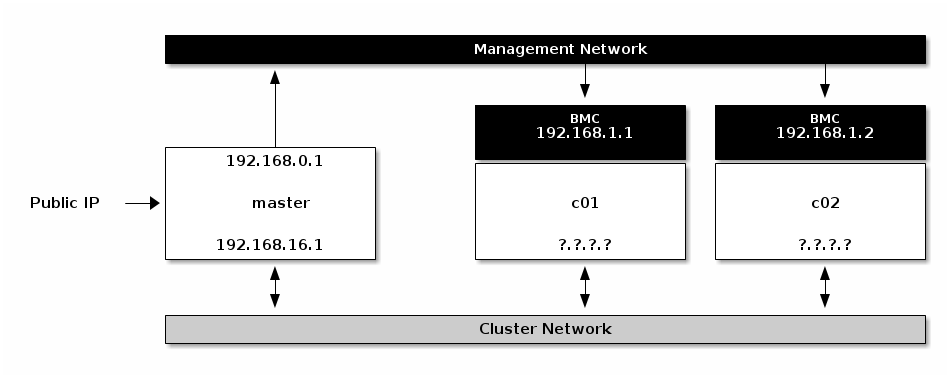
BMCs with assigned IPs via DHCP